AWS Machine Learning Blog
Access private repos using the @remote decorator for Amazon SageMaker training workloads
As more and more customers are looking to put machine learning (ML) workloads in production, there is a large push in organizations to shorten the development lifecycle of ML code. Many organizations prefer writing their ML code in a production-ready style in the form of Python methods and classes as opposed to an exploratory style (writing code without using methods or classes) because this helps them ship production-ready code faster.
With Amazon SageMaker, you can use the @remote decorator to run a SageMaker training job simply by annotating your Python code with an @remote decorator. The SageMaker Python SDK will automatically translate your existing workspace environment and any associated data processing code and datasets into a SageMaker training job that runs on the SageMaker training platform.
Running a Python function locally often requires several dependencies, which may not come with the local Python runtime environment. You can install them via package and dependency management tools like pip or conda.
However, organizations operating in regulated industries like banking, insurance, and healthcare operate in environments that have strict data privacy and networking controls in place. These controls often mandate having no internet access available to any of their environments. The reason for such restriction is to have full control over egress and ingress traffic so they can reduce the chances of unscrupulous actors sending or receiving non-verified information through their network. It’s often also mandated to have such network isolation as part of the auditory and industrial compliance rules. When it comes to ML, this restricts data scientists from downloading any package from public repositories like PyPI, Anaconda, or Conda-Forge.
To provide data scientists access to the tools of their choice while also respecting the restrictions of the environment, organizations often set up their own private package repository hosted in their own environment. You can set up private package repositories on AWS in multiple ways:
- Using AWS CodeArtifact
- Using Amazon Simple Storage (Amazon S3)
- Hosting a repository on Amazon Elastic Compute Cloud (Amazon EC2)
In this post, we focus on the first option: using CodeArtifact.
Solution overview
The following architecture diagram shows the solution architecture.

The high-level steps to implement the solution are as follows
- Set up a virtual private cloud (VPC) with no internet access using an AWS CloudFormation template.
- Use a second CloudFormation template to set up CodeArtifact as a private PyPI repository and provide connectivity to the VPC, and set up an Amazon SageMaker Studio environment to use the private PyPI repository.
- Train a classification model based on the MNIST dataset using an @remote decorator from the open-source SageMaker Python SDK. All the dependencies will be downloaded from the private PyPI repository.
Note that using SageMaker Studio in this post is optional. You can choose to work in any integrated development environment (IDE) of your choice. You just need to set up your AWS Command Line Interface (AWS CLI) credentials correctly. For more information, refer to Configure the AWS CLI.
Prerequisites
You need an AWS account with an AWS Identity and Access Management (IAM) role with permissions to manage resources created as part of the solution. For details, refer to Creating an AWS account.
Set up a VPC with no internet connection
Create a new CloudFormation stack using the vpc.yaml template. This template creates the following resources:
- A VPC with two private subnets across two Availability Zones with no internet connectivity
- A Gateway VPC endpoint for accessing Amazon S3
- Interface VPC endpoints for SageMaker, CodeArtifact, and a few other services to allow the resources in the VPC to connect to AWS services via AWS PrivateLink
Provide a stack name, such as No-Internet, and complete the stack creation process.

Wait for the stack creation process to complete.
Set up a private repository and SageMaker Studio using the VPC
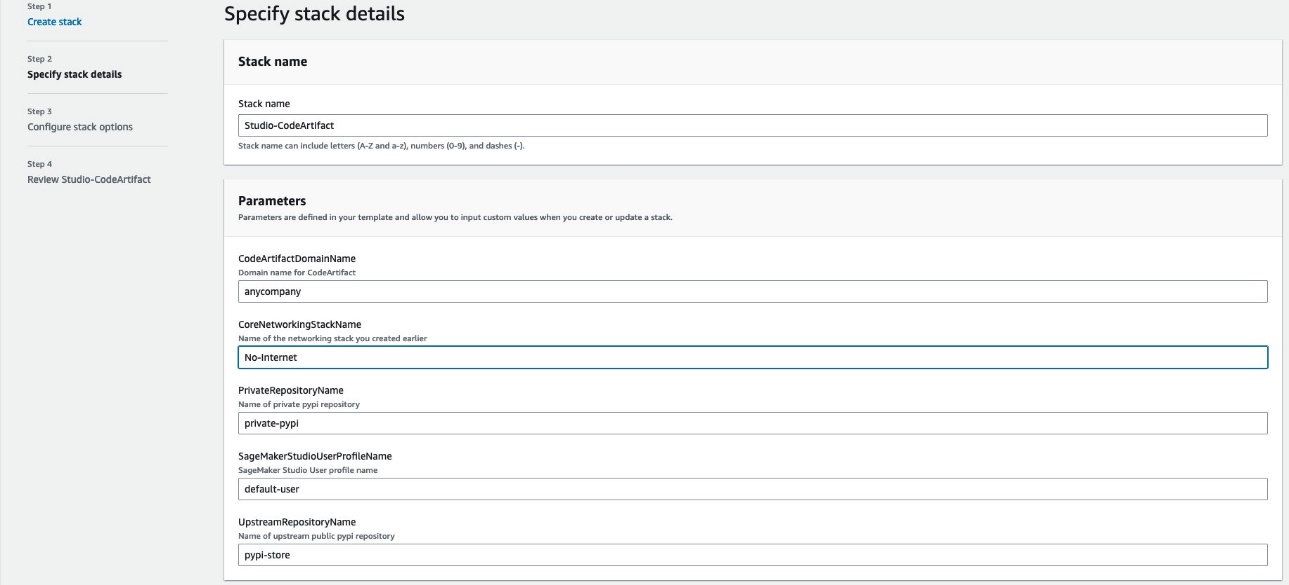
The next step is to deploy another CloudFormation stack using the sagemaker_studio_codeartifact.yaml template. This template creates the following resources:
- A SageMaker domain connected to the VPC created in the previous step
- A CodeArtifact domain
- A CodeArtifact private repository connected to an upstream public PyPI repository
Provide a stack name and keep the default values or adjust the parameters for the CodeArtifact domain name, private repository name, user profile name for SageMaker Studio, and name for the upstream public PyPI repository. You also we need to provide the VPC stack name created in the previous step.
When the stack creation is complete, the SageMaker domain should be visible on the SageMaker console.

To verify there is no internet connection available in SageMaker Studio, launch SageMaker Studio. Choose File, New, and Terminal to launch a terminal and try to curl any internet resource. It should fail to connect, as shown in the following screenshot.

Train an image classifier using an @remote decorator with the private PyPI repository
In this section, we use the @remote decorator to run a PyTorch training job that produces a MNIST image classification model. To achieve this, we set up a configuration file, develop the training script, and run the training code.
Set up a configuration file
We set up a config.yaml file and provide the configurations needed to do the following:
- Run a SageMaker training job in the no-internet VPC created earlier
- Download the required packages by connecting to the private PyPI repository created earlier
The file looks like the following code:
The Dependencies field contains the path to requirements.txt, which contains all the dependencies needed. Note that all the dependencies will be downloaded from the private repository. The requirements.txt file contains the following code:
The PreExecutionCommands section contains the command to connect to the private PyPI repository. To get the CodeArtifact VPC endpoint URL, use the following code:
Generally, we get two VPC endpoints for CodeArtifact, and we can use any of them in the connection commands. For more details, refer to Use CodeArtifact from a VPC.
Additionally, configurations like execution role, output location, and VPC configurations are provided in the config file. These configurations are needed to run the SageMaker training job. To know more about all the configurations supported, refer to Configuration file.
It’s not mandatory to use the config.yaml file in order to work with the @remote decorator. This is just a cleaner way to supply all configurations to the @remote decorator. All the configs could also be supplied directly in the decorator arguments, but that reduces readability and maintainability of changes in the long run. Also, the config file can be created by an admin and shared with all the users in an environment.
Develop the training script
Next, we prepare the training code in simple Python files. We have divided the code into three files:
- load_data.py – Contains the code to download the MNIST dataset
- model.py – Contains the code for the neural network architecture for the model
- train.py – Contains the code for training the model by using load_data.py and model.py
In train.py, we need to decorate the main training function as follows:
Now we’re ready to run the training code.
Run the training code with an @remote decorator
We can run the code from a terminal or from any executable prompt. In this post, we use a SageMaker Studio notebook cell to demonstrate this:
Running the preceding command triggers the training job. In the logs, we can see that it’s downloading the packages from the private PyPI repository.

This concludes the implementation of an @remote decorator working with a private repository in an environment with no internet access.
Clean up
To clean up the resources, follow the instructions in CLEANUP.md.
Conclusion
In this post, we learned how to effectively use the @remote decorator’s capabilities while still working in restrictive environments without any internet access. We also learned how can we integrate CodeArtifact private repository capabilities with the help of configuration file support in SageMaker. This solution makes iterative development much simpler and faster. Another added advantage is that you can still continue to write the training code in a more natural, object-oriented way and still use SageMaker capabilities to run training jobs on a remote cluster with minimal changes in your code. All the code shown as part of this post is available in the GitHub repository.
As a next step, we encourage you to check out the @remote decorator functionality and Python SDK API and use it in your choice of environment and IDE. Additional examples are available in the amazon-sagemaker-examples repository to get you started quickly. You can also check out the post Run your local machine learning code as Amazon SageMaker Training jobs with minimal code changes for more details.
About the author
 Vikesh Pandey is a Machine Learning Specialist Solutions Architect at AWS, helping customers from financial industries design and build solutions on generative AI and ML. Outside of work, Vikesh enjoys trying out different cuisines and playing outdoor sports.